A2 – review, ratings and guide!
Disclaimer
This is an early review for A2, so her rating can change in the future as we do more testing.
Information
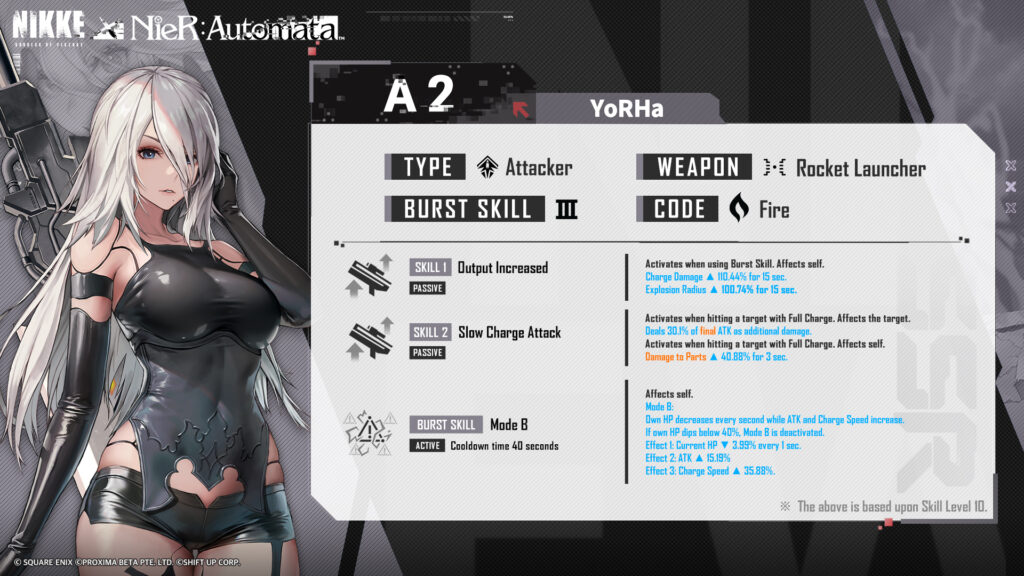
- Rarity: SSR
- Burst: III
- Weapon: Rocket Launcher
- Class: Attacker
- Element: Fire
- Manufacturer: Abnormal
- Squad: YoRHa
Skills
Review
Introduction
A limited unit with tremendous AoE damage, A2 can constantly wreak havoc on clustered targets. Whether these are Nikkes that she fights in the Arena or raptures in the warzone, she simply pays no heed. However, her specialty is part-breaking. She also serves as a great option for campaign pushing due to her magnificent explosion range. Geared with a unique kit which raises her output in exchange for HP loss, she is the perfect depiction of “with great power comes great responsibility”. Namely, you need to keep her healthy at all times. Can you?
Kit Analysis
A2 is a Rocket Launcher wielder with a high explosion range by default, 1.5x larger than most RLs in game. She also has a slightly higher base attack multiplier and naturally provides more burst generation thanks to her S2, increased charge speed, and bonus range. However, she is actually by far one of the slowest RL units when it comes to attack speed due to forced animation. In layman’s terms, in addition to the usual charging time, she takes an extra 0.8s per swing without Mode B and 0.4s per swing with Mode B active. This animation cannot be shortened with charge speed. This highly discourages uncharged attacks (or fast-tapping), but fortunately her kit revolves around fully charged attacks to deal maximum damage.
That aside, she possesses a unique burst skill that activates Mode B, which continually devours her HP in exchange for a slight ATK and Charge Speed boost as long as her HP stays above 40%. This prompts her to avoid hits as much as possible (one hit, and your buff is gone) and be adequately healed to achieve maximum uptime from this buff. The recovery needed will depend on A2’s MAX HP, as higher HP results in more HP loss per second overall as well as a higher threshold. In other words, although higher MAX HP means she can survive brutal hits, at the same time it will also be harder to keep her healthy. Taunters can help redirect attacks away from her, but this is unnecessary for Solo Raids (more on that below).
Mode B is permanently active if A2’s HP is always above 40%, but her S1 is not. This means you still need to burst with her regardless of whether Mode B is active.
A similar drawback also applies to ATK. Naturally, she has high damage multipliers but few ATK buffs, which allows her output to scale rapidly with attack OL and buffs from support units. However, higher ATK also means she might become the primary target of Solo Raid bosses, whose attacks will in turn deactivate her Mode B and decrease her total damage. In fact, her Mode B is also equivalent to having an almost permanent ATK buff, so pay attention to that too. To compensate this, you can always pair her with taunters or, in Solo Raids, consistently-high-ATK units such as Guilty, Modernia, Scarlet, or 2B. Any other units with higher base stats and more ATK rolls than her also work.
Remember, more is good but excessive is bad! The game starts from building optimal teams that can take advantage of each character’s strengths and counterbalance their weaknesses.
Performance Analysis
A2 sees a lot of potential use in campaign and bossing, especially the ones with more than two parts. In campaign, her increased explosion range can cover nearly the entire map, allowing her to clean all raptures at once, like a sandstorm! It will also sometimes bypass certain types of shield. In bossing, she is able to conveniently hit multiple parts, even if they are distant from one another. One well-targeted rocket will damage them altogether, multiplying the damage by the number of parts affected on top of the Part Damage and Additional Damage (only once per enemy regardless of the number of parts) buffs provided by S2. That being said, her damage on bosses without parts is just grim.
Some testing shows that against bosses with 2 or more parts, a highly invested A2 has the potential to outdamage Alice and even Modernia. This might not apply to everyone, but her damage seems to be promising!
When it comes to PvP, she might not be the best, but if you do not own other units, you are always free to use her. Without Mode B, she is capable of hitting the target plus two adjacent Nikkes at once. With Mode B, she is capable of hitting every enemy unit at the same time (starting at S1 level 7). However, her damage is on the low side, so do not hold too much expectation. Her damage is also gradual (hence, she will likely die to units that have tons of gradual healing or units with instant or nearly instant damage like Scarlet or SAnis). Moreover, since the Additional Damage instance of S2 does not trigger on covers, her burst generation is similar to that of a normal RL (like Laplace or Noise) but instead works at timings of 1.5 RL, 3 RL, and so on.
If you want the equation, A2 hits 3 Nikkes * 2 ticks each plus 3 covers, resulting in 9 * 1.3% = 11.7% burst generation per hit.
Investments
As mentioned earlier, A2 works even at lower investments, but she scales well with skill levels (not as rapidly as some units).
Skill investment
- Skill 1
Start at level 5. Consider upgrading to 7 or higher if extra range is urgently needed. This will allow her to harm targets or parts in a larger area and inflict around 2% more damage per shot with each level (compared to base level), when active. Helpful in campaign stages. In Arena, only starting at level 7 will she hit everyone at the same time for 15s after burst, even if she is hitting P1 or P5. This skill only activates when you use Burst Skill, so always use it even if Mode B is active. The overall uptime should be around 50~60%, contributing to an average of 1.1% damage increase for each level. - Skill 2
Start at level 5. Consider upgrading to 7. This will allow her to deal significantly more damage against parts (even for splash damage) but not the main body. The values are quite high, so despite the niché effect, it is worth it. Against bosses with two or more parts, expect 1.2%+ more damage per level. Note that against bosses with no parts, upgrades are useless! - Burst Skill
Start at level 5; recommended to upgrade to 7. Can delay upgrading or never upgrade at all. The ATK and charge speed buffs are on the low side, but the reduced HP loss per second might prove valuable. If the HP loss is too fast at level 5, consider upgrading her Burst Skill. Mathematically, each level should amount to around 2.5~3% damage boost. Nevertheless, you can obtain ATK and Charge Speed buff from OL. Remember, too much ATK, and she will be targeted in Solo Raids.
Start at 5/5/5. Upgrade skills as needed for tiny boosts of damage. The damage increase from S1, S2, and Burst are independent of each other, so they stack multiplicatively. To conserve materials, it may be wiser to upgrade Burst only when your healers cannot keep up. Save your manuals for other units such as 2B and future units (anniversary imminent).
Gear Investments
Like usual, overload all her gear pieces. Upgrade her Helmet and Gloves for more ATK. You may leave the Body at 0 if you feel like you will have trouble healing her at higher levels. Otherwise, a tiny boost of ATK will always be appreciated. For the overload, you may go down two major paths:
- The ATK Route
This route allows A2 to deal the most damage, but it might turn her into the highest-ATK unit in your team, causing attacks that would otherwise hit other units to redirect toward her. In this path, you prioritize getting 1 max ammo line (2 is okay, still) and as many ATK and elemental lines as possible. Two max ammo lines are acceptable, but more than two is pointless. Expect around 35~50% increased output (zero elemental considered). Note that this build is much more prone to ATK dilution. - The Charge Speed Route
Worried that your A2 will accidentally have the highest ATK? Then, this is your option. The effectiveness of this path is half of the first one (around 20~30%), but A2 should pretty much never take hits from Solo Raid bosses (assuming the attacks prioritize units with highest ATK). In this path, you try to acquire charge speed and max ammo lines. We recommend getting 2 max ammo lines and around 3-4 charge speed lines. This build allows her to benefit more from ATK (less dilution) and charge speed (stacking) buffs.
Fun Fact: Max Ammo lines become more useful if you have more Charge Speed lines as these reduce your uptime, and uptime-downtime ratio determines her overall damage. What is uptime? Uptime is the time taken for a unit to empty an entire clip. Thus, we recommend only 1 for the ATK build but 2 for the Charge Speed build.
Cube Investments
Resilience is preferred if no Max Ammo OL. Otherwise, just use your highest level cube for more attack and elemental damage bonuses. Adjutant might actually be the best in slot but more testing needs to be done.
Team Composition
She is decent against bosses with parts, in which case she should enter one of your best teams. Against bosses with no parts, you can consider putting her in one of your worst teams instead. The support buffs that she mainly wants are ATK, Charge Speed, Charge Damage, and Part Damage. CRIT buffs are also acceptable (but NOT Mast). Max Ammo is relevant only if you do not have any Max Ammo OL.
Here are two requirements when building A2’s team:
- You need at least one healer for A2, which can be in B1, B2, or B3 positions.
- in Solo Raids, A2 should be paired with a taunter if damage cannot be evaded, or she must not have the highest ATK at any time. The last two Solo Raid bosses prioritize hitting units with the highest ATK (so they are technically taunters without taunting skills). Some units have an ATK stat that fluctuates, such as Alice. This can be hard to work with. Remember, OL lines can change how a unit functions! For example, if your Alice has 2 ATK lines, and your A2 has zero, then Alice will be targeted all the time.
In light of that, here are some units that you may find a suitable pairing for her:
- For DPS B1, Liter and Dorothy are strong contenders. Liter gives substantial ATK buffs, while Dorothy provides Part Damage. Normally, you decide which team will get Liter or Dorothy after forming the core units. For Healing B1, Pepper and SMary can be chosen instead if no one else is healing A2. Rapunzel heals less but still can be used. Remember, their healing strength is dependent on their MAX HP. If A2 is highly invested, but these units are not, they may not be healing enough.
- For universal B2, Blanc fits both worlds and is probably the best pair (but she is the best pair for everyone). There is nothing much going on with B2, except for the fact that you can use Dolla, Summer Helm, Yuni, Novel, Folkwang, or other DPS B2. Rupee or Guilty has a naturally high ATK and can be used as a taunter in Solo Raids.
- For B3, you can pair her with Noir & Blanc for more damage overall. If we ignore the duo, two primary units come to mind. Alice can boost her charge damage and speed, whereas Maxwell can boost her ATK and charge speed. Drake is an alternative too. If A2 has the highest ATK, then you can consider adding Modernia, Scarlet, or 2B as a shield in Solo Raids. One interesting choice is Helm. A2 with lifesteal is surely exciting, but for Helm team to work, you need to make sure that you refill burst gauge quickly. How quickly? Well, at max Burst level, you have about 22 seconds (-10 from Burst), so you have 12 seconds to refill the bar twice. Manageable but strict. At lower levels, however, it is a total nightmare.
Example team compositions:
- Liter Blanc Alice/Maxwell A2 Noir
Probably one of the theoretically best teams for A2. A2 benefits from increased charge damage, charge speed, and ATK buffs provided by Alice/Maxwell, Noir, and Liter. The healing from Blanc is more than enough. However, problem occurs if Alice/Maxwell does not have the highest ATK all the time, so make sure to address that by giving them some ATK lines. Another thing to note is that Alice usually breaks parts quite fast, but A2 wants to leave them intact longer so she can keep doing splash damage. A2 also aims for spots where she can reach all parts with ease, but Alice may want to aim at the parts directly. This can be a problem against some bosses. However, if you use Maxwell, you will waste Blanc & Noir’s legendary supportive buffs because her overall damage is weaker than Alice. - Liter/Dorothy Blanc A2 Noir Modernia/Scarlet/Guilty/Rupee/SW/2B
Say goodbye to Alice. You now have just demoted Alice. One major difference from the first team is that these units have built-in ATK buffs, which easily makes them the highest ATK unit in the team. For Snow White, you still need to give her a few attack OL lines, however. Now, your A2 can pretty much be happy knowing she would not get shot in Solo Raids. - Liter SR/RL A2 Helm FLEX
A strict team that tests your limits. In this team, you must manual SR/RL and Helm to achieve maximum burst generation. This team allows A2 to heal using Helm’s buff, then spend the next 22s (at max level) waiting for it trigger again in the next rotation. You must only spend 12s at worst to refill the burst gauge twice. Otherwise, her buff will deactivate just before you reach the next Helm’s rotation, causing tons of damage loss. Avoid this team at lower burst levels at all costs. For more detail: A2 starts losing HP at the end of Helm’s burst. Then, between that point and the next Helm’s burst, you will undergo two burst gauge charging phases and one full burst phase. The full burst takes 10s, leaving only 12s for the remaining two charging phases. This 12s window is much shorter at lower levels of Burst Skill. - Pepper/SMary/Rapu CDR A2 FLEX FLEX
A2 enjoys fewer buffs here, but at least she can remain healthy. Pepper’s healing is less reliable than SMary, so SMary is preferred here. Also, this team is reliant on the healers’ investments as their healing scales with their MAX HP. Start with A2’s burst, then by the time you enter her 2nd Burst rotation, she should be able to maintain Mode B indefinitely.
Screenshots
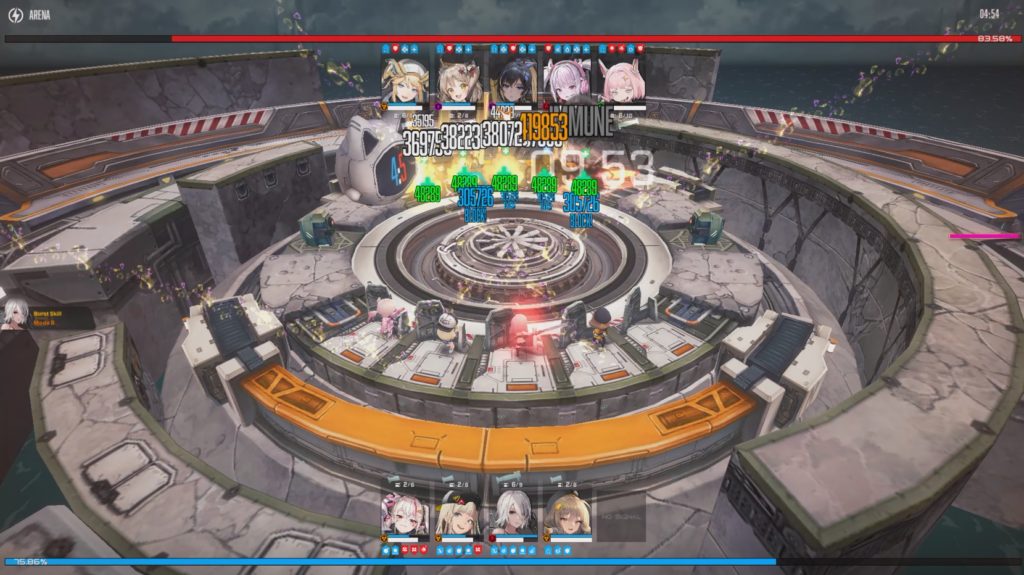
A2 on Burst hitting everyone at the same time. Thanks to Valkkin for providing the screenshot:
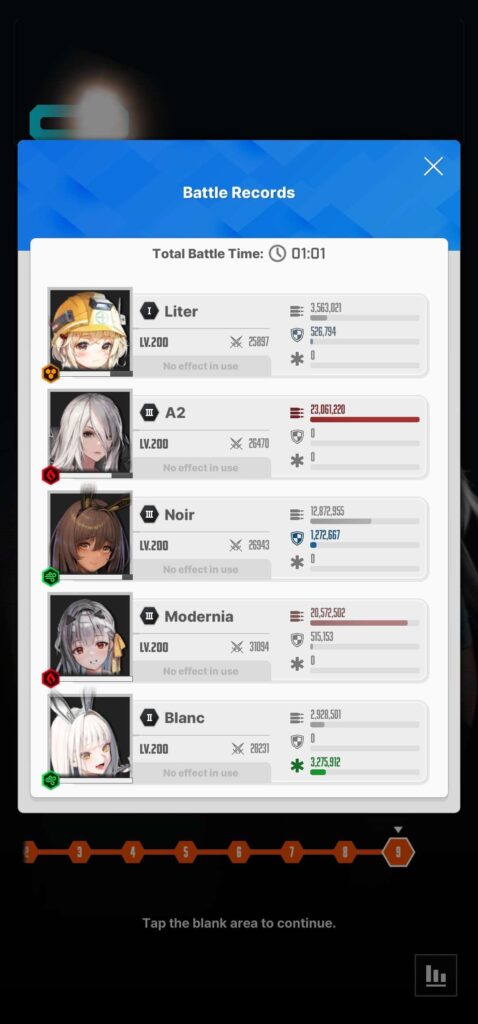
Tested against Chatterbox, with A2 full OL, Charge Speed variant, 5/5/5, 0 LB. Chatterbox’s parts broke too fast, so biased toward Alice (MLB):
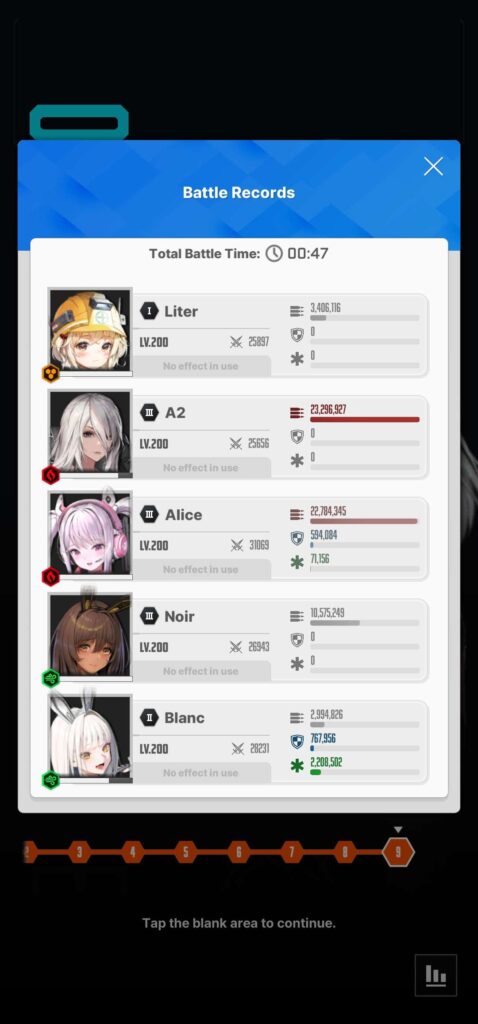
Tested against Chatterbox:
Pros
- Scales really well with ATK buffs (like Modernia).
- If there are many clustered mobs or parts, A2 can easily hit all of them at once.
- Deals massive damage to bosses with 2 or more parts.
- Satisfying to use in campaign stages.
- Auto-friendly, no need to manual her at all unless you need to aim for a specific spot.
- Investments are cheap. A2 is usable with minimal investments but she scales well with skill levels.
- Has the highest range for an RL (comparable to Summer Neon’s Burst Skill at max level).
Cons
- She scales best with ATK OL, but too much ATK makes her the enemy target in Solo Raids.
- Against bosses, she has negligible damage if boss has no parts.
- Requires a healer and ideally a taunter (either Taunt skill or another unit with more ATK) to perform.
- Increasing MAX HP (from limit breaks and gear) might end up making it harder to maintain her HP above threshold.
- Fast-tapping is not possible due to forced animation.
- Forced animation reduces the benefit of charge speed. Although it says she has 1s charge speed, her actual attack rate is much slower without Mode B. In Mode B, animation duration is halved.
- S1 is tied to using her Burst Skill and is not permanent, so you need to burst with her regularly despite Mode B being active.
- Limited unit.
Ratings
- Story (early): SSS
- Story (late): SS
- Boss (solo): SS
- Boss (adds): SSS
- PvP: S
Special thanks
Special thanks to SJayKin (Valkkin) from Nikke.gg and many others for the cooperation when writing this guide.
