Wuthering Waves – Meta Update
Foreword
A week has passed since Wuthering Waves’ release and during that time we’ve been hard at work updating our guides based on the changes that occurred on release and new discoveries found by our team and most importantly you the community! Of course, we’ve also been progressing through the current endgame content – Tower of Adversity.
Sadly, while the game is really fun, there are a lot of bugs that make playing, testing, and as a result making guides for it properly harder than it should be. We already covered the translation issues in our previous blog, but they are just the tip of the iceberg. We would like to thank the community again for sending the bugs they encountered our way – without you all, it would be impossible to catch all of them.
Here are just a few of the many… examples of bugs that we encountered recently. These bugs won’t hold us back but we’d just like to again make it clear just how important your help has been in maintaining accurate and up-to-date guides!
Mech Abomination
The Mech Abomination Echo is insanely powerful after its rework that happened with the game’s release and it’s the go-to Echo for anyone using the Lingering Tunes set. Still, for whatever reason, the Echo deals less damage when you equip the 5-piece set compared to just wearing the 2-piece one. The 5-piece effect should increase the Outro Skill DMG by 60% and also grant up to 20% ATK.
With the Mech Abomination Echo damage being treated as Outro damage as per its tooltip, you would expect its damage to increase, but the opposite happens and you deal less damage instead. This leaves us wondering if should we base our guides on what happens in the game or what the tooltip says?
We hope to see this bug specifically addressed soon.
Here’s a video showcasing it:
Impermanence Heron
If you manage to snag the shiny version of the Impermanence Heron Echo, don’t use it. It actually reduces both the damage and the energy gain compared to the normal version. This one is easy to work around but we felt it worth highlighting to hopefully spread the word to those potentially taking a performance loss.
Endgame Completed!

We’ve spent a lot of time farming echoes and progressing in Tower of Adversity, focusing on testing as many characters as possible with the goal of finding the strongest teams to allow everyone the best advice when investing and progressing themselves! To remove biases and ensure we covered as many perspectives as possible we collaborated with the community and other content creators.
Our team managed to complete all stages in the standard Towers on both the left and right side of the Hazard Zone, obtaining 3 stars in the first 3 stages and 1 star in the last one. We focused on using only S0 5-star characters and at most S1 weapons, to make the testing as ‘realistic’ as possible for the majority of the playerbase.
You can find videos of the exact teams used and the clears within this article.
As mentioned we worked with many people in our study of the endgame, some of who we’d like to shout out specifically for spending their time in discussions and brainstorming sessions with us.
- Zajef77 is attempting to clear the ToA without doing even a single summon, so he extensively tested the ‘free characters’ and shared his findings with us, offering fantastic insight into characters many are overlooking and likely will never build.
- IWTL represents the opposite spectrum – he’s a high spender, using his S6S5 Jiyan to dominate the ToA, being able to fully 3-star not only both the side towers but also 3-star the hardest stage in the middle tower using the Jiyan+Mortefi+Verina meta team.
There were many more players and content creators who helped us and we would like to thank everyone involved.
The combination of all the testing done by us and others has led to many new findings that will be discussed in the rest of this article. They are also the driving force behind our latest tier list update and will contribute to major guide updates in the coming days. The general consensus is that assuming you have correctly configured teams and are capable of surviving a stage through dodges or healing, acquiring maximum stars is primarily a damage check which will be solved mostly with higher character levels.
Endgame Tips And Discoveries
Here’s a list of discoveries and tips we learned we feel should be especially helpful to you in Tower of Adversity at the current time while still building out your characters and leveling up.
The Utility of Healing
Before 1.0 healing was widely considered to be a mechanic for those without the appropriate skill to dodge enemies. While there is certainly some truth to that healing in our experience made things much much easier.
Firstly not all enemy damage is easily avoidable, specifically encounters containing multiple enemies you cannot dispatch quickly, healing makes these encounters much safer. Healing is also strong enough in Wuthering Waves even at low levels to allow you to strategically tank one or even multiple hits to execute a high damage combo only to heal it up later improving overall team damage.
We expect healing to become less impactful at higher levels and of course, is less important on boss stages but for now, it’s certainly not as useless as expected especially if you’re prone to missing 1 or 2 dodges.
The Worth of Area of Effect
Many stages especially in the mid and early portion of ToA contain multiple enemies and waves. To put it simply the difference between a team splashing into or committing to AoE and one built around a single target is day and night for these encounters. Having access to some form of AoE makes progressing through the Tower much easier and while the hardest floors each feature a boss even some of those contain a wave of multiple enemies before them. AoE ranges in value from being a complete free pass on stage in the aforementioned stages to extremely handy in the boss stages containing add waves. AoE is not to be underestimated and should definitely be considered!
Staying on the AoE topic, due to the AI of many monsters they have a nasty tendency to spread out. Having a character that allows you to gather enemies back up like Jianxin makes a huge difference. Because of this Jianxin ended up being one of the top support picks right behind Verina for the initial push through the tower.
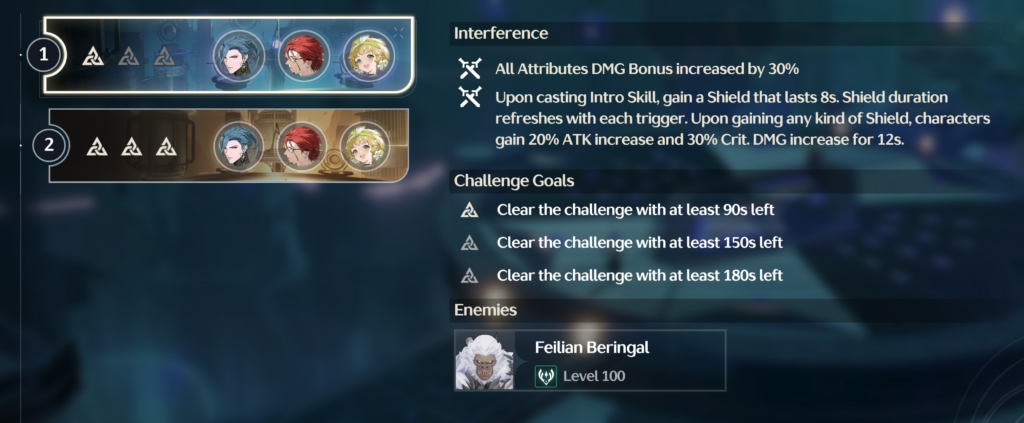
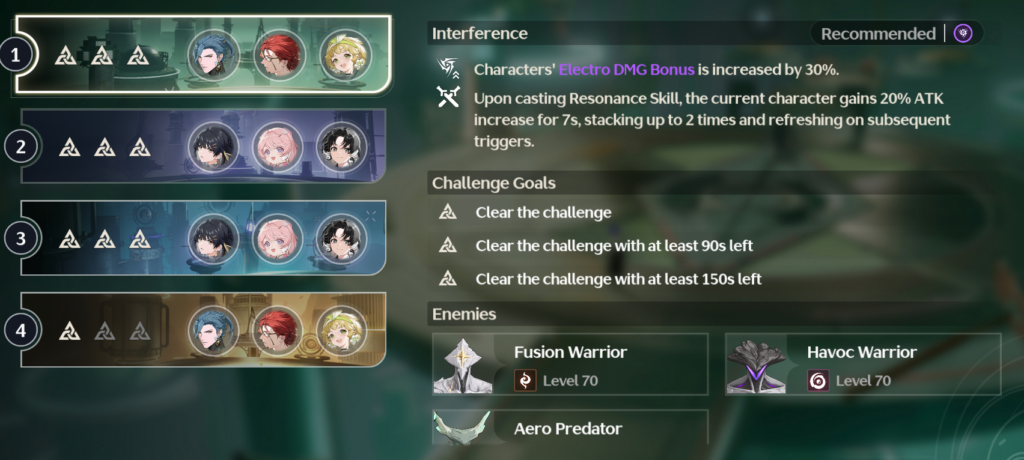
The Brutality of Resistances
Resistances are brutal in this game and ignoring them carries a heavy burden. As an example, if you were to attack a Havoc-resistant enemy with a Havoc damage dealer like Danjin or Rover based on our testing you can expect to deal at least half the damage as hitting a non-resistant enemy. Some have even reported on boss-specific enemies they experienced up to 70% damage reduction (Aero RES level 100 Ape).
The solution to this is of course to have a diverse roster of elemental damage and or feature teams with multiple elements.
Effective Team Allocation For Easy Clears
The vigor system in the Tower of Adversity allows for a lot of freedom when allocating the placement of your units. Right now there is a specific strategy that allows for a far easier time clearing the majority of ToA and that is to split your roster into a strong (single target) and weaker (AoE) team. The strategy aims to allow you to use your most powerful team against both of the hardest end stages of both the side towers which always contain a boss -in this case Tempest Mephis and Impermanence Heron.
Each team can use up to 10 Vigor with Floor 1 costing 1 Vigor, Floor 2 costing 2, and so on and so forth. If you place your strongest team on the hardest floor (Floor 4) twice you’ll consume 8 Vigor, you can place the same team on Floor 1 on both sides and utilize all 10 Vigor knocking out the hardest and easiest stage of both towers respectively.
All your remaining team needs to do, is clear out the middle stages of both Towers (3 + 2 twice) to complete the standard set of Towers. This split allows you to take advantage of the fact that Floors 2 and 3 are generally AoE floors and Floor 4 generally has a more single target demand focus. You can gear up and construct your teams with these facts in mind.
Team Archetypes
During our testing of multiple different units and compositions, we discovered that most teams fell into one of two archetypes – Quick Swap or Hyper Carry. Each of these archetypes has a very different playstyle and set of priorities but are both equally as viable albeit in different ways.
Hyper Carry
Hyper Carry compositions revolve around amplifying a single DPS usually with the help of two supportive characters with the goal of allowing them to pull off their combo with as many buffs as possible while unhindered. The current widely considered most powerful team of Jiyan, Mortefi, and Verina falls under this archetype with Jiyan responsible for 80-90% of the damage of the team – a common hallmark of Hyper Carry compositions.
The trademark feature of Hyper Carry teams is stacking both support sets and echoes (Rejuvenating Glow + Bell and Moonlit Cloud + Heron) alongside one or multiple Deepen multipliers with whatever other buffs you can get your hands on for truly absurd burst windows.
Due to this team archetype’s reliance on outro Deepen buffs and aligning buff windows they generally do not make use of quick swapping during their burst window, this is one of the most notable differences between the archetypes.
Right now the following characters are the most clear-cut Hyper Carries in the game:
- Jiyan (with Mortefi)
- Lingyang (with Sanhua)
Some still viable but less common Hyper Carry targets are:
- Danjin (Mortefi)
- Havoc Rover (Sanhua)
- Encore (Sanhua)
Quick Swap
Quick Swap teams are a relatively unexplored team-building option from what we’ve seen so far among those in the global community but are absolutely a force to be reckoned with. The premise behind this team archetype is to rotate through each of your characters quickly triggering all their resonance skills, echoes, liberations, and combos while swap-canceling everything possible.
The swap cancel mechanic in Wuthering Waves is absurdly powerful, allowing characters to continue performing almost any action while no longer being on the field. As an example, Encore can cast her skill which generally takes 1.6 seconds to complete but when swap canceled, you can fully execute this skill in 0 seconds thanks to swapping to the next character while she casts. With this tactic, you can cycle through all your characters’ cooldowns while reducing most of the longest cast times to close to 0.
Another benefit of swap canceling is that the character left on the field after the cancel is immune to all damage. So not only is the Encore from earlier casting her skill in 0 time she’s now doing it while completely immune. Fast players that execute swaps at high speeds can sometimes even have all 3 characters present on the field at the same time!
Quick Swap teams tend to value high damage resonance skills and cooldowns in general so don’t be surprised to see multiple damage dealers in these compositions. The general team configuration is generally two damage dealers and one support using the 5P rejuvenating glow set alongside the Bell-Borne echo.
The hallmark feature of these compositions is of course the frequent switching, non-reliance on burst windows or deepen mechanics, and favor towards units with long cast times but high multiplier values. The result of this is a fast-paced flashy playstyle with many team-building options and a wide variety of viable character combinations.
The following characters are a few of the ones we found most effective in quick swap teams (but there are far more):
- Havoc Rover
- Encore
- Calcharo
Meta Teams – Examples
In this section, we’d like to share the teams that performed exceptionally well for us and others during our push through the tower (we can definitely recommend them).
Team #1 – Havoc Rover Quick Swap
This team was relatively unknown before the game’s release as Havoc Rover, one of its primary members was unavailable in CBT2 and is at its core a quick swap team. The team focuses on cycling through and swap-canceling Havoc Rover and Encore’s powerful cooldowns with a specific focus on abusing the incredibly powerful cancellable Dreamless and Inferno Rider echoes for huge cleave damage. The team’s final member depends on your needs and is incredibly flexible but is almost always a carrier of the 5-piece of the Rejuvenating Glow set and Bell-Borne Geochelone Echo. Here are the options we found worked and why:
- 1st pick – Verina. Grants insane damage boosts and healing,
- 2nd pick – Jianxin. Perfect for stages with a lot of enemies as she can group them for Rover and Encore to cleave them easier with their bursts,
- 3rd/4th pick – Yangyang. Slightly groups enemies, but not remotely as good as Jianxin but can provide Rover with additional resonance energy and an ATK% boost (at S6),
- 3rd/4th pick – Baizhi. A far inferior version to Verina with weaker buffs only buffing 1 character instead of both and more on-field time. But still an option if Verina is already in use and or you want some healing.
As a quick swap team here are the abilities to focus on keeping on cooldown and also swap canceling. Here’s a list of the key abilities you want to swap cancel in this team:
- Encore:
- Resonance Skill
- Inferno Rider 3rd slash
- Forte Gauge Cosmos Rupture or Cloudy Frenzy
- Havoc Rover:
- Resonance Skill (Normal)
- Resonance Skill (Umbra)
- Dreamless
If you’ve already used all your abilities and you’re waiting for their cooldowns to finish, you can switch to Encore and perform her Ultimate rotation for additional burst damage, or to Rover while in the Umbra state to use their enhanced basic attacks.
In conclusion, when played correctly, you’ll rotate through your characters while avoiding most damage thanks to swap cancels while dishing tons of damage yourself. An additional advantage the team brings is that you cover Havoc and Fusion damage at the same time, so even if there’s an enemy resistant to one of them, the other can still kill them easily. If you don’t have Encore she can be replaced by Danjin which will result in the loss of your dual-element benefit but you’ll gain another Dreamless echo to use on your team which is considered more powerful than Inferno Rider.
Team #2 – Jiyan Hyper Carry
The Jiyan Hyper Carry team supported by Mortefi and Verina was predicted to be one of if not the best teams in the game before release and… did not disappoint with many getting the best results in ToA using it.
At its core, the team revolves around building Concerto on Mortefi and Verina to enable their incredibly powerful Deepen outros to buff Jiyan’s Ultimate rotation. With all buffs active Jiyan deals absolutely disgusting pure AoE damage delivering pain and destruction to all in his path. After the action’s over this team can quickly restock its resources ready for round two and with enough Energy Recharge outside of a few skills here and there Jiyan will never spend a moment on the field outside of his ultimate state.
Here are a few tips when playing the team:
- When not executing Jiyan’s ultimate rotation with all buffs up, try to keep all character’s resonance skills on cooldown to generate maximum energy while in downtime,
- You don’t have to stay on one character to fill up their Concerto from 0 -bouncing between all 3 characters while executing the above can be more beneficial as long as you don’t trigger a concerto prematurely.
- When entering Jiyan’s burst combo he’ll start in the air due to his intro. Don’t wait until he lands on the ground – his intro damage is a spear throw which you can observe and it deals its damage before he lands. Cast the ultimate in the air right after his intro spear lands for maximum duration.
This composition has great AoE, great parrying (Jiyan auto parries everything during ultimate), great crowd control, is easy to play, and has incredible sustain thanks to Verina.
Tier List Updates
Considering everything covered here, we’ve decided to make some changes to the tier list.
Main DPS
The Main DPS role has been renamed to simply DPS due to the prominence of the Quick Swap archetype. This archetype as we’ve covered frequently features multiple characters from the “Main DPS” role listed on our tier list which is a bit confusing as you can’t really have two “main” anything. To avoid this, we have renamed it to simply DPS.
Jianxin
Jianxin has been moved to Support category and her rating has been increased from T1 to T0.5.
After discussing, reviewing, and testing different playstyles put forth by the community, creators and our own team Jianxin has found great success support role thanks to her CC, defensive nature, gathering, and situationally powerful outro. As big Jianxin fans, we’re very happy she’s able to shine in the AoE portions of ToA. To go into a bit more detail here is a list of our thoughts on her positions, benefits, and a few cool findings:
- Her gathering ability is incredibly strong for the middle (2 and 3) stages of ToA which feature AoE mob fights, making clearing them easier, and can sometimes extend its usefulness even in boss stages with pre-add waves,
- The Mech Abomination echo that spawns a small AoE around all targets in its radius possesses quadratic scaling and against multiple enemies gathered by Jianxin things can get crazy fast. This combo has some drawbacks against enemies with larger bodies due to them not clumping as nicely though.
- Jianxin on-field time can be very low when played specifically in quick-swap teams. By the nature of these teams, they don’t specifically rely on concerto so Jianxin doesn’t need to worry about her usual struggles with generating it. The result of this is that Jianxin can limit her field time to a few basic attacks, her skill, echo and ultimate if desired making for lightning-fast contributions.
- In the little time Jianxin is on the field in quick swap teams, her parry makes her immune to damage for most of her on-field time.
While Jianxin has great utility now and is our 2nd top support pick at the moment she loses a lot of her impact when AoE isn’t involved and we expect as or when players begin to value AoE less or new supports are released her value will drop at that time. Having said that it would be a disservice not to raise her to where we feel she belongs for 1.0’s tower of adversary.
Here’s a comparison of Jianxin’s (S0) pull range with Yangyang’s just to showcase just how powerful Jianxian’s pull is in comparison to the competition:
Calcharo
Calcharo is a character causing quite a stir among the community with our team included. On paper, he has reasonable damage, but when factoring in switch canceling to that same paper it becomes incredible. Theory is one thing but the execution is another. Based on our team’s testing Calcharo is certainly a harder character to play than Encore, Havoc Rover or Jiyan, and we’ve struggled to achieve similar results with him so far with many in the community echoing that sentiment.
With that said we won’t don’t feel it appropriate to make adjustments to his rating yet – we want to see more from the community and also test him more ourselves. Having said that here are a few of the key takeaways we discovered when testing his kit so far.
- Death Messenger and Mercy have a very long animation (roughly 2 seconds) that can leave you vulnerable especially due to its melee range. While in the animation you can be damaged but worse than that knocked back canceling the damage.
- The above can be completely mitigated by making use of switch cancels and at high level play we felt it improved the feel of his gameplay immensely. But this creates quite a challenging playstyle in our experience as, unlike Encore or Rover, you must first execute a 3 or 5 attack combo before the switch cancel meaning you will still need to dodge and weave in melee range somewhat.
- Getting stunned, performing a switch cancel to slow, or performing too many dodges during Calcharo’s ultimate window can lead to damage losses due to the incredibly tight window his ultimate enforces around the 3 Death Messenger standard combo. It’s more likely than not you’ll miss out on the full damage of this combo in real combat which simply doesn’t happen often on competitors like Jiyan or Encore.
- Calcharo has limited AoE and range built into his kit which can make dealing with additional enemies especially when they spread out annoying. We found this could be made up for with a fellow DPS partner like Encore or Havoc Rover which can complement Calcharo in the switching playstyle.
- We feel the above will be solved by Yinlin who should serve as the perfect switch cancel partner for Calcharo fixing his AoE and also giving him a much better option than Encore or Havoc Rover.
- We have received a lot of reports from players with higher latency (200+ ping) not being able to execute Calcharo’s full triple Death Messenger combo, even in tutorial mode. We are currently investigating how this impacts his viability for these players.
We are keeping a very close eye on what the community cooks up with Calcharo in ToA and will be doing further testing ourselves to get a better read on his power level.
Encore
We have removed the Ult tag from her as when being played in the Quick Swap teams she’s not reliant on her Ultimate as much as in Hyper Carry teams.
Yinlin
We have removed Yinlin from the tier list. Considering the amount of changes made by Kuro just before the release and on the release itself, we’re afraid that she will be changed too on her release. Once her kit is revealed and we will be able to test her, she will be added back to the tier list.
Yuanwu
We are still looking for a spot for Yuanwu in the current meta and while we’re struggling to find a place where he shines we’ll continue our testing and keep an eye on what the community brings forward.

wUWA NOOB
what changed in Jianxin’s build or rotation ? it’s still long in the guide section. Is she playing mostly for her grouping and damage and her shield/healing not necessary ?
Tzfn
I also want to know how to build her now for a team quick swap havoc rover
Groth
Just 10 pulls tô ger One 5*. I currently have Encore and Verina. Which other 5* should I get, I’m in doubt between Calcharo and Jyang
KekCheburek
Thank you for the post!
I want to try quick swap team, i already have jianxin and rover, but i haven’t encore. What character can replace encore?
mb mortefy?
Zephan
Danjin
Matheus
danjin with dreamless
anal queen
hi guys
liam
Why advertise IWTL? Such worthless info lol
Rover
Who else is gonna spend thousands to get c6 and report back how strong each one is and whether it is working properly? You? lol
Notneeded
The “shiny” version of echos are called phantoms. And they do absolutely nothing, I don’t see why you’re giving false info on that. It’s literally nothing other than a skin/retexture of the original. There’s no way it changes the damage. Either you guys did some flawed testing with it, got your info on both versions from different people on different accounts, or got your game bugged in a way that shouldn’t be possible. No matter the reason, it’s not the games fault, it’s the fault of whoever tested it.
Xiuh
So they aren’t supposed to do anything, but go test it yourself. My Heron without the echo skin does ~20% more damage with no other changes.
Also not reported here, Thunder Mephis skin makes the damage buff apply on the first hit instead of the last hit.
This is likely a bug that links back to CBT2 when the Phantom echoes actually did have different scaling and abilities.
Iirc Phantom heron dealt less damage but gave a bigger buff on swap; mephis was first hit buff instead of last. Etc
jUN
Do you have any plans to organize them into Team Meta categories like this?
Xiuh
So they aren’t supposed to do anything, but go test it yourself. My Heron without the echo skin does ~20% more damage with no other changes.
Also not reported here, Thunder Mephis skin makes the damage buff apply on the first hit instead of the last hit.
This is likely a bug that links back to CBT2 when the Phantom echoes actually did have different scaling and abilities.
Iirc Phantom heron dealt less damage but gave a bigger buff on swap; mephis was first hit buff instead of last. Etc
Hadmos
Would you guys agree that Yinlin is an upagrade over Encore in the first team with Havoc Rover?